
Refurbishing an old model
- Tamas Seres
- Apr 13, 2020
- 3 min read
Updated: Apr 15, 2020
I have built this Tamiya Jagdpanther a few years ago, back at the time when I picked up modelling again. No wonder I had made several serious mistakes on this build. The painting and weathering wasn't great either. Therefore, I have decided to refurbish the old lady.
This is the original look of the model.


I have decided to apply a three-colour camo from the last few months of the war. Let's start with a Tamiya acrylic field grey as base colour.

Then, added 10/90 mix of flat white and hull red in the desired pattern. Low air pressure, small moves. I have masked the jerrycan as I wasn't sure to keep it's original colour or repaint it later.


Once the 'brown' is finished, I added the light yellow in a similar style.


I was hesitating a lot whether to add any markings to this vehicles. This turned out to be a more challenging task than I had expected:
- 1st attempt was some old Tamiya decals. First they looked OK-ish. Nevertheless, I cocked them up badly with the decal-softener. I probably could have fixed it, but as I wasn't fully satisfied with them in the first place I just through the decals in the bin and corrected the base paintwork.
- Next, I chose to go with hand paining. That did not look good at all. Needed to fix the base paintwork - again.
- Finally, I found some better quality decals in my stash that looked good enough to use and appropriate for this vehicle and paining scheme. Hardcore experts may argue, but I only want a realistic outcome, not to build one concrete vehicle. So, I had a thin layer of gloss varnish before applying the markings. Once the decals were properly done I gave the whole vehicle a layer of flat clear from Tamiya.


Pin-wash with oils applied afterwards. It may look a bit strong at this stage, but when the rest of the vehicle will be weathered probably it will blend in perfectly. At this stage I painted the details, too: tools (although they were often painted together with the vehicle to its base colours), periscopes...etc.

Mig washes also applied. But those tracks, they look awful.

Luckily, I had a pair of spare Dragon DS tracks at hand. So, the next stage of the work started...

While I was working on the tracks I have also decided that I will do something with those spare track links on the back of the tank destroyer. The way I glued them back at the time has hardly anything to do with how they were carried on the real vehicles.

New tracks in place. I was surprised how soft these DS tracks are. I am not sure if it is a good thing or bad. Nevertheless, there are a few nice features of it: 1.) they have the hole in the guiding horns (which is often missing even from the Tamiya and some Dragon individual track links) 2.) it is really easy to put them on even when replacing an old set on a finalised model 3.) they work well with the superglue

A bit of chipping before the pigments are used...

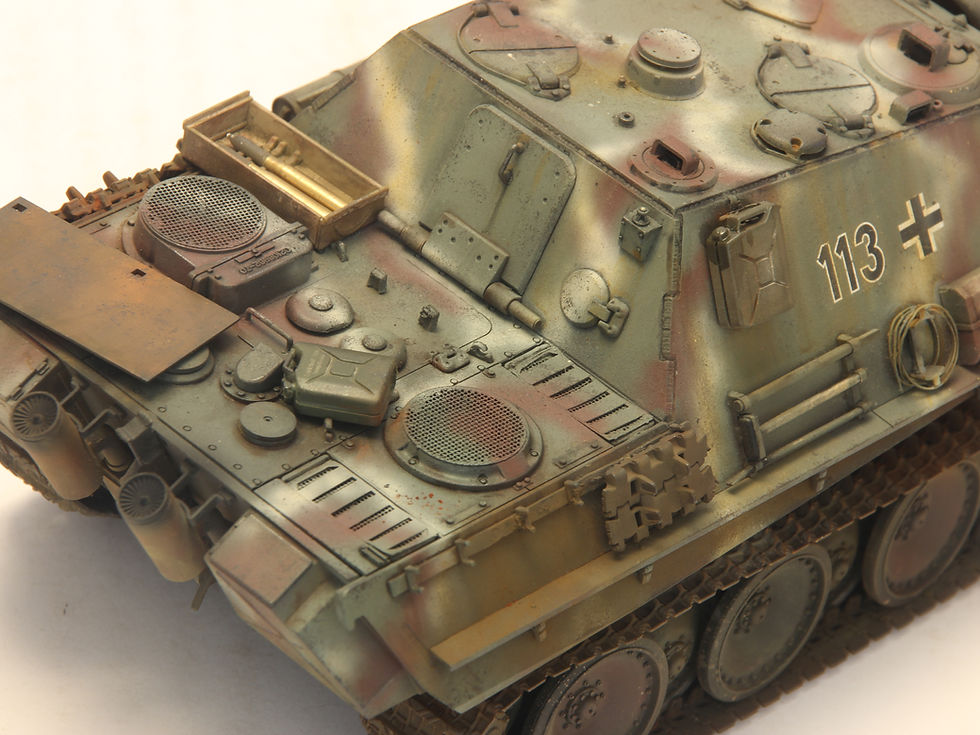
Coming nicely together. The spare tracks need to be looked after. And, the shutters on the engine grills on the left-hand side are still an issue as they were only used only on the right side on the real vehicles. I'm gonna cover them with a piece of unpainted skirt and an ammo box.


More photos can be seen in the Gallery.


Comments