
King Tiger (production turret)
- Tamas Seres
- May 9, 2020
- 3 min read
Updated: Nov 6, 2020
I have decided that my next build would be a king tiger. I wanted a nice and detailed kit, but not a an exhausting, painful build. I was after a late war vehicle without zimmerit, so all pre-production turret kits were excluded. A dragon kit caught my attention, however it is unfortunately quite expensive. Then, I found this Meng kit meeting my expectations for half the price. As I had good experiences with their Merkava, so I went for it. But did I make a good decision? Let's find out...
The build starts with the lower hull, suspension and wheels - as always.


No surprise, everything straight-forward, the parts fit all very well. Usual silicon ring solution makes it easy to fix/remove the wheels. Building the lower hull is a relaxing exercise.


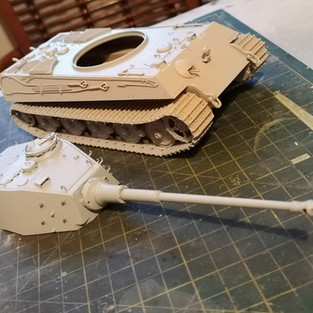
The upper hull is nicely done, too.


Meng sells full interior kit for this vehicle, but I am not interested in that this time. So, I simply leave those holes untouched on the fenders as no one will see them when the tank is complete.
How do the upper and lower hulls fit?

I have to admit: I have never seen so perfect fit. Seriously.
Another thing: have a look at the surface of this kit. That gentle touch of rolled steel is amazing.

The photo-etched parts are fitting accurately, too.


I had a small accident with the cable of the headlight. I probably should have changed it for copper wire, but probably this will do the job and won't look too bad on the final model.

When I assembled the turret I ran into a misfit, unfortunately. It was probably my mistake that I haven't checked appropriately the final position of the underlying front panel. Anyway, a good filer and some putty helped.


The turret was otherwise an easy build.
The track looked also promising as Meng provided with a bespoke tool to shape the individual links so as it has the perfect sag. Just covered with masking tape so as the track wouldn't stick to the tool.

Now, I have to confess that the most annoying challenge of the kit was lurking for the unprepared modeller with those tracks. They somehow don't fit properly, which is really frustrating. Especially, as they have two types of links following each other in the tracks. So, you can't just insert an extra link because it won't fit. However, adding one from both types would make it extremely loose as the difference is roughly half a link.


As this is a design issue, it appears on both sides, unfortunately. The final solution was to cut one link in half and insert it in the track. Luckily, it is not jumping out and the painting and weathering will help to hide it even more.

After this unexpected adventure finally the tank was ready for painting.


Started with Tamiya light grey primer.


Dark yellow as base colour (xf-57 Buff) As I didn't want to put the mudguards on as if they were lost over the battles I covered the area they would have been fitted so as it won't get the camo colours


In order to get hard-edge camo I used 'Panzer putty'. Not joking, that is the name of the product.


The camo colours all applied and I faded them out a bit.

.The next step was to add the dots for the Ambush pattern.

As I want to build a s.H.Pz.Abt. 509 March 1945 vehicle, it will need an incomplete and really worn white layer, too. Something like this:

I went with a lighter yellow as in my experience after weathering lighter colours get darker. In order to be able to create the worn impression of the white wash I sprayed a layer of flat clear on the finished ambush pattern. Then, I applied a layer of AK 'worn effects' before painting the white (xf-2)


Once it dried a bit I started to wash it off with water by using a brush, a toothbrush and a cocktail stick.


This was then followed by painting the tracks and the smaller details.


I wanted to build a tank with a really dirty and muddy wheels, but I have limited experience on this field. So, I have to admit that I tried various different techniques ...


...but I am still not fully happy with the end result. I think I need to learn and test a bit more before I would want to do something like that again.
Anyway, I believe the overall outcome of the model looks OK.


Would I recommend this kit? Definitely yes. It is a nicely detailed model and great build. But watch out for the tracks: either prepare for some extra DIY or buy an aftermarket set.
For more pictures please visit the gallery.


Comments