
Full interior Bergepanther
- Tamas Seres
- Jan 21, 2024
- 5 min read
A full interior kit always tempted and scared me at the same time. I consider this as the next level of modeling as it is significantly more complex challenge than the average kits I have built so far. A lot of hard work, many traps and at the end of the day it is rather difficult to show all the fine work done, once the model is complete. I have to admit, I am still not sure what is the best way to display a full interior model.
However, as the Bergepanther has a much more open hull than an average Panther it looked to be a good idea to test my skills on one of these vehicles. I must tell you though, I was really scared throughout the whole build. This was a completely new territory and I simply couldn't know when I was making a mistake that is hard or not even possible to fix. However, I would never know (and never learn) if I never tried. So, I took a deep breath.
For this project, I chose this Takom kit:

The build always should start with a careful planning: in order to make sure that all necessary tiny parts are painted and weathered correctly it is essential to know when to pause building and add the right colours and effects to the model. This is my general guiding rule. However, it couldn't be more true in case of a full interior kit.
The build starts with the lower hull, gear box, torsion bars...etc


Fitting all the bars into the right place requires a lot of patience. I believe, Takom could have picked an easier way for this, but at the end of the day, it is not impossible.
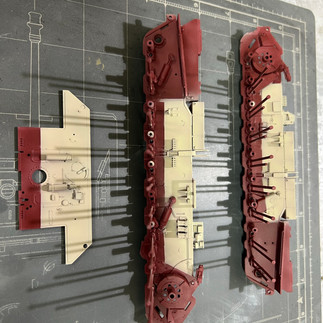
I have decided right at this tstage to start apply the necessary colours. The main interior colours of these vehicles are:
red-oxyde primer in the engine hull and the bottom of the tank
ivory-ish colour in the fighting compartment. Somewhere I read that this light colour could help to spot oil leaks.


As the Bergepanther is a recovery vehicle it provided with the opportunity to showcase the engine: not as if it was this vehicle's Maybach power source, but hanging from the crane freshly removed from another Panther.


Completing the engine was followed by painting it and applying weathering to everything done so far.


The engine, after basic painting :


Once the paint and washes dried everything came along nicely.


The winch is workable and pretty staright-forward to complete as far as I remember. I cannot recall any huccups.


The upper hull was the next to complete. You need to add the radio, and openning mechanism for the driver's hatch. It is probably needless to say that painting and weathering had to be applied on the upper hull too before completeing the full body of the vehicle.
The kit offers removable deck floor for the working compartment so it is completely up to us if we want to build and showcase the winch, or just cover it up. I have decided to make this a bit even more flexible and split the wooden floor boards as they were on the real tank.


In the meantime, some internal details were also painted. Unfortunately I am not even near as good with painting these tiny parts as I would like to, but this time I was really happy with the outcome. After the base colour was airbrushed, I used oils for the details.


After gluing the lower and upper hulls, I wasn't fully happy with the fit of the sides of the front armour plates

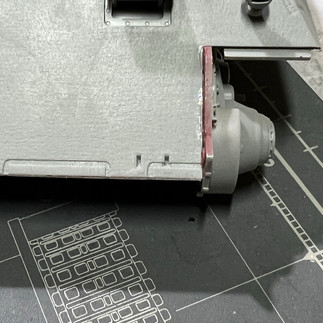


I decided to add some welding to these places, just like you can see it on the original vehicles. I cut a small piece from the sprue and stretched above a candle light, the same as you would do to make antennas. I cut it to the required size and glued them in the right place with Tamya Extra Thin Cement. It was applied generously to dissolve this small piece of plastic and then added the unregular pattern with the back of a hobby knife. Not perfect, but certainly looks better with it than without.


It was now time to start painting the exterior of the model. First, I needed to cover up all the opennings on the hull so as I wouldn't ruin everything that was painted so far. I have seen somewhere on the internet that someone used sponge for this purpose and as I didn't have any better idea, I tried it.
It worked neatly.


After pre-shading the model a dark-yellow base colour was applied. Then, this was oversprayed with a thin layer of white to imitate winter camo.


It was then time for painting the tools and other details. Chipping and weathering was applied, mainly on the parts that are hard to reach at a later stage. For creating the texture of mud and dirt I used AK's Thick Mud. I like this product a lot as it is very easy to use, dries quickly and with different paints and pigments it can be used for many different purposes.


I have decided to swap the kit's tracks for Friul ones for three reasons:
I've had bad experiences with these type of Takom tracks
I wanted to have the best for this model
i had a spare set of the appropriate traks in my stash


And, that was it, basically. The rest is what I usually do to complete a model: finalize the weathering by burnishing the metal tracks, applying washes and pigments. Finally, checking out the details and fix, that does not look good enough.


Yes, I can see flaws on this model now, such as more dirt and mud on the tracks would look nicer, slightly more weatering to the hull would improve the look and feel of the model, just to mention a few. Nevertheless, I like where it ended up and I still see the risk in over-doing something and cocking up the model. But who knows, I may come back to it one day.
What are my key take-outs from this build?
I loved building this kit. A full interior kit is a lot of work, but it certainly worth the efforts.
Such a kit requires much more planning, than a usual model. Especially, as you go ahead with the build. You need to check constantly what your next move is going to be and change plan if necessary.
Take your time. The level of details is amazing, just dedicate everything enough time. Don't rush anything.
I am still not sure what would be the best way to display a full-interior kit to show more of what's inside.
Below you can find a few photos of the complete model, but more to be found in the Gallery.


Comments