
Abandoned King
- Tamas Seres
- Oct 10, 2022
- 4 min read
It was several years ago when I first saw this picture and somehow it captured my imagination immediately.
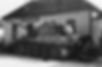
An abandoned King Tiger somewhere in Hungary in 1945. I knew ever since that I would build this very tank at some point in the future. It looks like the time has arrived in 2022.
The kit I picked for this project is this Hobby-boss one:

It was very promising, good quality and well-detailed kit. This is the closest I could find to the one I wanted to build and required the least of modificatioin.


The towing cable came as one piece with the attaching points and not as separate items, unfortunately. Hence, I had to fill the holes on the upper hull and make them from some left-over PE frames in order to make it look like the original one: this tank has lost its tools that would have been kept on the side. By the way, the kit comes with nice PE grills fitting perfectly.
The next challenge came with the barrel. As the tank ran out of fuel, the crew had to make it unfit for battle. They have removed all useful and movable equipment, such as the radio and machine guns. Then, they exploded the main gun. As a result of this the muzzle brake came off the barrel.
The kit comes with a one piece solid barrel, so if I wanted to leave the muzzle brake off, I had to drill a hole into the barrel. Unfortunately my Dremel tool was not at hand, but let's say I found a solution...


Working on the turret wasn't bad, although you have to pay attention where to attach the hooks for the spare tracks as they are not only hardly visible on the model, but a bit confusing, too.


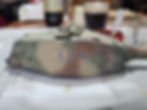
The rest of the build was rather straight-forward. I just always kept an eye on the original photo constantly.
The painting started with Tamiya light grey primer. It was followed by a solid pre-shading and the main colour: Tamiya dark yellow II.


The camo came next: Dark Green II. and for the brown I have used a mix, although I have to admit I have forgotten the colours I used and their exact ratio. Sorry, folks.
I was keen on using really light and subtle shades, especially knowing that the washes and weathering would make the whole vehicle a bit darker.


And now let's talk a bit about the Acilles heel of my build: the turret number.
I simply could not find the appropriate size and font type decal for the numbers. Now I know that: 1.) I could have tried some home-made stencils and paint it, 2.) there are decals that I would have needed in a dragon (at least I think, it is a dragon) kit. After finishing and posting my work on facebook a nice chap reached out to me and offered his ones. I have them now, but not yet had the courage to apply them and re-paint the turret. This is something though that is still yet to come one day...
However, the size and the shape were not the only issue with the decals back then. After applying the ones I had the carrying film was really standing out. I have used the necessary products, e.g. decal softeners and yet, the result was quite disappointing.


I decided to fade them a bit by overspraying the edges with the main colours.
Not perfect, but not too bad either. Adding some chipping and weathering have further improved it.

The chipping was applied with a piece of small sponge and two colours: dark iron and red oxyde.
Before the proper weathering I have also painted the surface that should have been covered by the mud guards with red oxyde primer. These beasts got the main colours once they were fully assembled, hence the mud guards covered these parts. If you have a look at the original photo it can be clearly seen on it, too.


The wheels got a similar 'treatment' as the body, but a bit more intense as they were much more exposed to physical impact. They also got some enamel and oil washes. The running surfaces of the wheels were coloured by graphite.

Although the kit comes with decent tracks, nothing compares to Friul, in my opinion. As this has been a long-awaited project I have decided to buy the aftermarket tracklinks.


For the the lower hull and the tracks I have applier some Vallejo Earth Texture. I love this product as it is pretty versatile and applying it carefully can create a really nice texture to the parts being exposed to dirt and mud.


Then, the final assemble, a bit of weathering mainly with pigments applied both dry and wet. And, basically that was it. Will I fix the turret number? Certainly, I will at one day. But for now, I am happy with I have got.
And, how about the kit? - you may ask. Well, in my experience it is a decent kit, really nicely done, you get basic PE with it and once piece barrel, nice level of details all for a decent price and no hiccup with the assemble. Can you whish for more?
